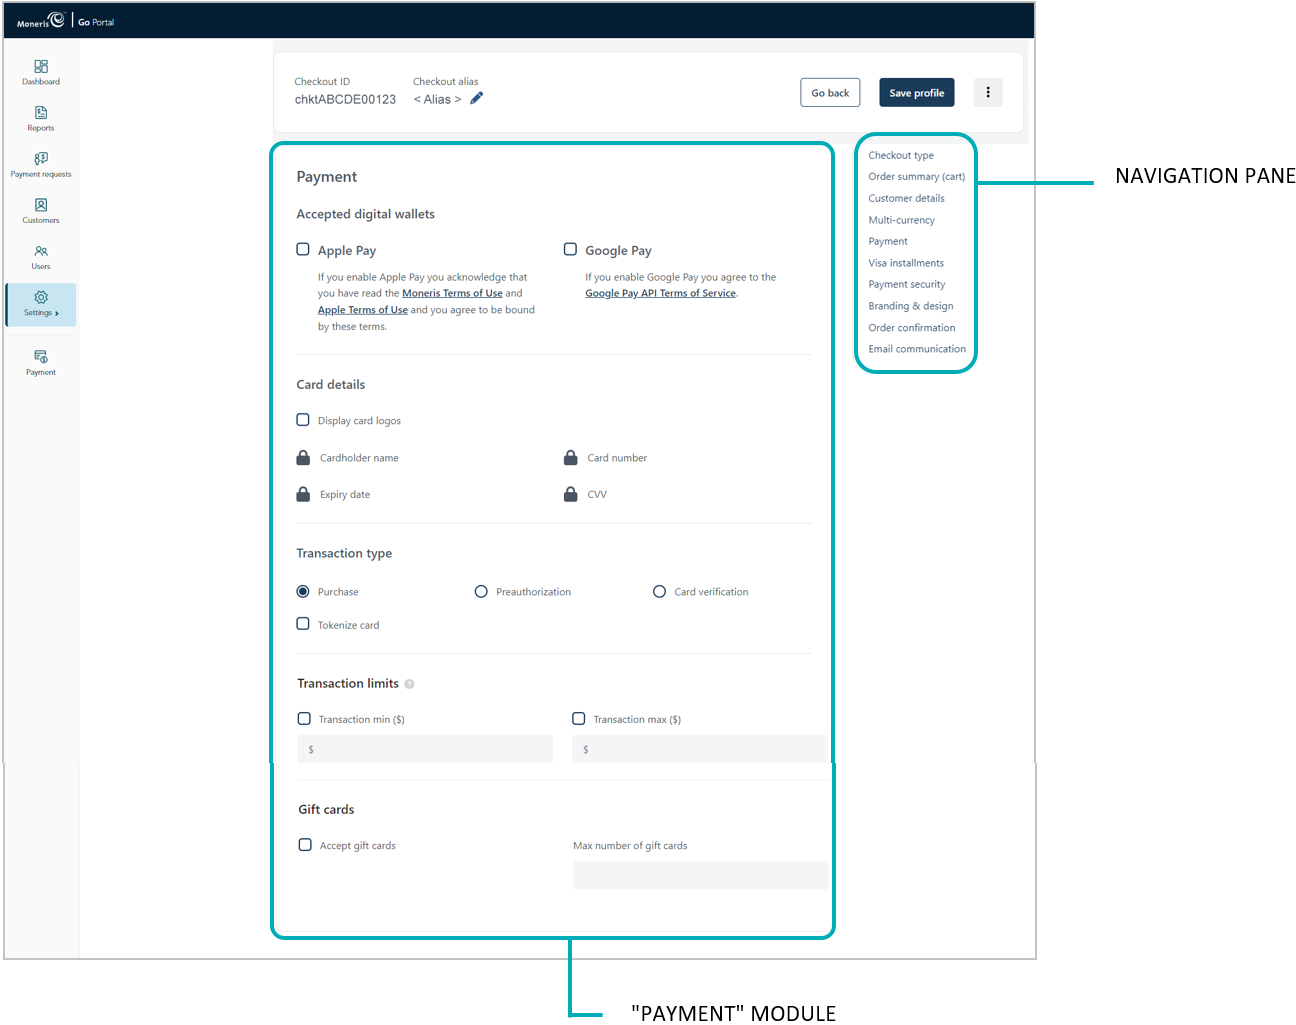
Follow the steps below to configure the checkout's payment settings, including digital wallets, card logos, card details, transaction type, gift cards, and transaction limits.
Important! To integrate Moneris Checkout into your ecommerce solution, you need to create and configure your Moneris Checkout profile in conjunction with developing your ecommerce solution according to Moneris' integration specifications as outlined in How to get started.
Ensure the checkout profile that you want to configure is open on your screen.
Note: To reopen an existing profile, see Reopening a Moneris Checkout profile. To create a new profile, see Creating a Moneris Checkout profile.
While the profile is open in your configurator, click on Payment in the navigation pane to jump to the "Payment" module (shown below).

To configure digital wallets, go to the "Accepted digital wallets" area in the module, and:
For Apple Pay:
To enable Apple Pay, see Enabling Apple Pay in the checkout.
To disable Apple Pay, unmark the Apple Pay box.
For Google Pay:
a. To enable Google Pay, checkmark the Google Pay box.
b. Click on Google Pay API Terms of Service to review the terms.
Note: To disable Google Pay, unmark the Google Pay box.
To enable card logos, go to the "Card details" area in the module, and checkmark Display card logos box.11
Note: To hide (disable) card logos, unmark the Display card logos box.
To set the transaction type, go to the "Transaction type" area in the module, and:
a. Select the radio button beside the desired transaction type (Purchase, Preauthorization, or Card verification).
b. To enable Moneris to tokenize and store card data, checkmark the Tokenize card box:22
Note: Enabling this feature will allow your checkout customers to register a debit/credit card for future transactions through the checkout. Returning customers can opt to use a previously registered card as their payment method.
c. To allow stored card data to be updated through the checkout, checkmark the Vault Update Card box.33
Note: Enabling this feature will allow returning checkout customers to update debit/credit card data that they previously registered through the checkout.
To configure gift card acceptance in the checkout, go to the "Gift cards" area in the module, and:
a. To enable gift card processing, checkmark the Accept gift cards box.44
Note: To disable gift card processing, unmark the Accept gift cards box.
b. To limit the number of gift cards that can be used to pay for any one transaction, enter a numeric value from 1 to 5 in the Max number of gift cards field. Otherwise, to disable limits, leave the field unfilled.
To set the transaction amount minimum and/or maximum that can be charged for any one order submitted through the checkout, go to the "Transaction Limits" area in the module, and:
a. To set a minimum, checkmark the box beside Transaction min ($), and enter a dollar amount (#.##) in the corresponding field.
b. To set a maximum, checkmark the box beside Transaction max ($), and enter a dollar amount (#.##) in the corresponding field.
Note: To disable a limit, unmark the box beside the undesired limit type.
Save the profile's new configuration:
a. Click on the Save profile button.
b. When the "Successfully updated the profile" response displays, the operation is complete:
To preview a full-screen version of the checkout, see Previewing the checkout.
To configure other profile settings, see List of Moneris Checkout features/settings.
To exit the MCO configurator, click on the Go back button (unsaved changes will be discarded.