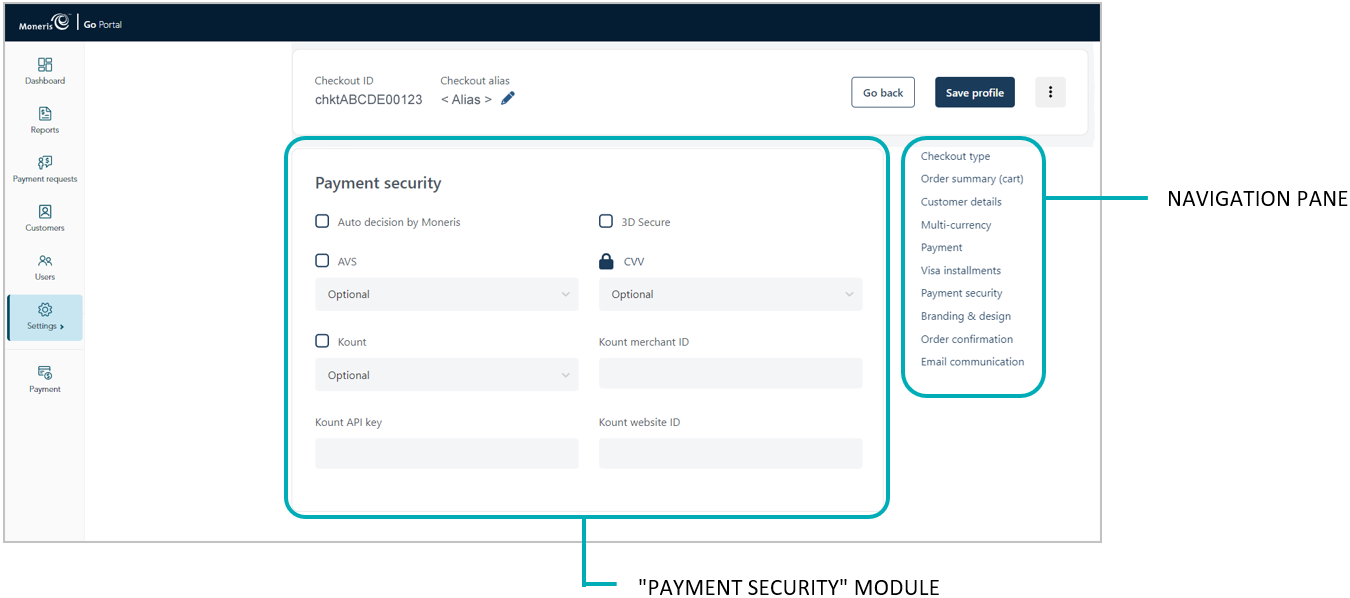
Follow the steps below to configure the checkout's payment security fraud-prevention tools, including 3-D Secure, address verification (AVS), card verification value (CVV), and Moneris Kount (if supported in your merchant account). 11
Important! To integrate Moneris Checkout into your ecommerce solution, you need to create and configure your Moneris Checkout profile in conjunction with developing your ecommerce solution according to Moneris' integration specifications as outlined in How to get started.
Ensure the checkout profile that you want to configure is open on your screen.
Note: To reopen an existing profile, see Reopening a Moneris Checkout profile. To create a new profile, see Creating a Moneris Checkout profile.
While the profile is open in your configurator, click on Payment security in the navigation pane to jump to the "Payment security" module (shown below).

To enable Moneris to determine how transaction requests are handled in the checkout, checkmark the Auto decision by Moneris box. (To disable this feature, unmark the Auto decision by Moneris box.) 22
To enable one or more fraud-prevention tools including AVS, Postal code only, CVV, 3D Secure, and Kount, checkmark the box beside the desired tool. 33 (To disable a tool, unmark the box beside the undesired tool.):
a. If you enabled "Auto decision by Moneris" (step 3) and you enabled one or more fraud-prevention tools (step 4), configure each tool to make its "pass" response mandatory or optional in transaction requests (for each tool, select Mandatory or Optional from its corresponding drop-down). 44
b. If you enable "3D Secure" authentication55 for this MCO profile (step 4), you must ensure the customer contact fields and the billing address fields that you submit are populated with data as described below:
If the profile is configured to use Moneris' checkout forms (see Configuring the "Checkout type" setting), enable mandatory data entry in the customer details fields "First Name", "Last Name", "Email", "Phone", and "Billing Address" (see Configuring the checkout's "Customer details").
If the profile is configured to use your own custom checkout forms (see Configuring the "Checkout type" setting), ensure that the contact fields ("first_name", "last_name", "email", and "phone") and the billing address fields ("address_1", "address_2", "city", "province", "country", and "postal_code") are populated with data in your preload requests.
c. If you checkmarked the "Kount" fraud-prevention tool (step 4), you must enter your Kount account details in the following Kount fields:66
In the Kount merchant ID field, enter your Kount merchant ID (if you need to obtain this ID, contact your authorized Kount representative).
In the Kount API key field, enter your Kount API key (if you need to obtain this key, contact your authorized Kount representative).
In the Kount website ID field, enter the ID of the Kount fraud-prevention program that you want to apply to your checkout (if you need to obtain this ID, contact your authorized Kount representative).
Save the profile's new configuration:
a. Click on the Save profile button.
b. When the "Successfully updated the profile" response displays, the operation is complete:
To preview a full-screen version of the checkout, see Previewing the checkout.
To configure other profile settings, see List of Moneris Checkout features/settings.
To exit the MCO configurator, click on the Go back button (unsaved changes will be discarded).