The steps below describe how to add a new user account to a Moneris Go portal store and define the user's access to store features and functions, including any point-of-sale device or application that is synched to the store.
Important! Each user account must be assigned with a user role. Ensure that you configure your store's user roles appropriately (i.e., enable/disable portal and terminal permissions as desired) before you attempt to assign them to user accounts. For instructions on how to add, modify, or delete user roles, see the User and role management section.
Log into the Moneris Go portal, and access the store through which you want to add the new user account (see Logging into the Moneris Go portal).
Note: If multiple stores are linked to your user account, you can use the My Stores function to move between your stores (see Using My Stores).
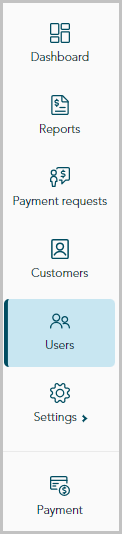
On the sidebar menu (shown below), click on Users.
Note: If the sidebar menu is not displayed on your screen, click on the "menu" ![]() icon in the top left corner of your screen, or expand your browser window to display the sidebar menu.
icon in the top left corner of your screen, or expand your browser window to display the sidebar menu.
When the "Users" page displays (shown below), click on the Add user button.

When the "Add user" window displays (shown below), configure the account settings:
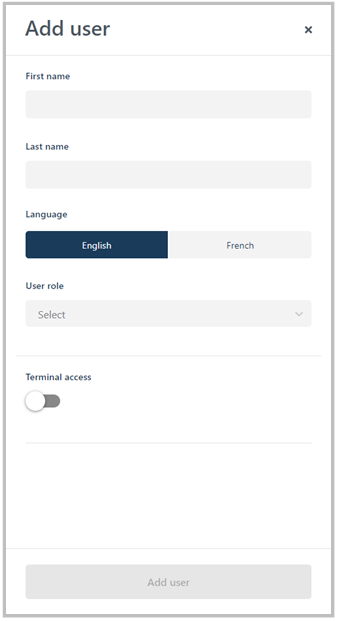
a. In the First name field, enter the user's given name.
b. In the Last name field, enter the user's surname.
c. Under "Language", click on language button (English or French) to select the Moneris Go portal display language for when the user first logs in to activate
their account.
d. Click on the "User role" drop-down, and select the role that you want to assign to this user:
Note: Default user roles and descriptions are listed in the table below. To view/modify the parameters of a user role (e.g., change role name or define new permissions for a role) or add/delete a user role, see the User and role management section.
| User role | Portal access | Terminal access | Description |
| Admin | Yes | Yes | Access to all functionality in the application. |
| High | No | Yes | Access to all transactions types and reports but limited access to settings. |
| Low | No | Yes | Access to all transaction types but limited to their own transactions within reports. |
If the "Add user" window displays the Terminal access switch (shown below), toggle it to the right ("yes"/blue) to enable terminal access, or toggle it to the left ("no"/grey) to disable terminal access.

If "Terminal access" is toggled to "Yes":
The user will have access to specific terminal functions as defined by the role's permissions.
a. In the Username field, enter the user name credential this user needs to enter to log into any terminal that is synched to this store.
b. In the Password field, enter the user password credential this user needs to enter to log into any terminal that is synched to this store.
c. In the Confirm Password field, re-enter the user's terminal login password.
If the "Add user" window displays the Portal access switch (shown below), toggle it to the right ("yes"/blue) to enable Moneris Go portal access, or toggle it to the left ("no"/grey) to disable portal access.
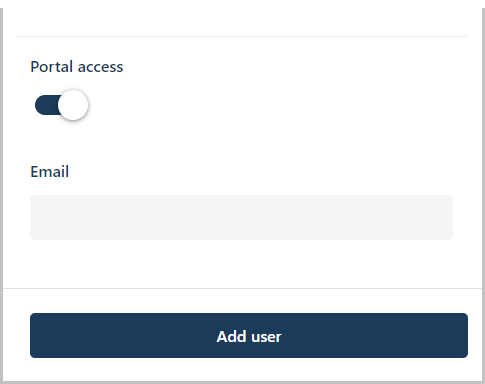
If "Portal access" is toggled to "Yes":
This option is supported only if the user role assigned to this user is configured with the "Access to portal" permission enabled. The user will have access to specific Moneris Go portal functions as defined by the role's other permissions.
a. In the Email field, enter the user's email address.
Note: Once the new user account is added to the system, an email containing an activate hyperlink will be sent to the user so that they can activate and complete the setup of their user account.
Click on the Add user button to add the new user account.
When the new user account is listed on the "Users" page, the operation is complete. But note:
If you granted the user portal access, their account status will indicate "Pending" until the user receives their email and sets up their account per the steps documented in Activating your Moneris Go portal user account via activation email.
Note: If the user did not receive their activation email, advise them to check their email spam filter. If this does not work, confirm that you entered a valid email address in the "Portal Access" Email field. If necessary, repeat the Add a new user account procedure, but try registering a different email address.
If you granted the user portal access and their email address is already registered to an active account, the user will not receive an activation email. Rather, the user has immediate access to the store when they log in.
If you want this user to have access to another store that is linked to the primary user account, access the desired store and repeat the Add a new user account procedure (you can configure the same login credentials for the other store).