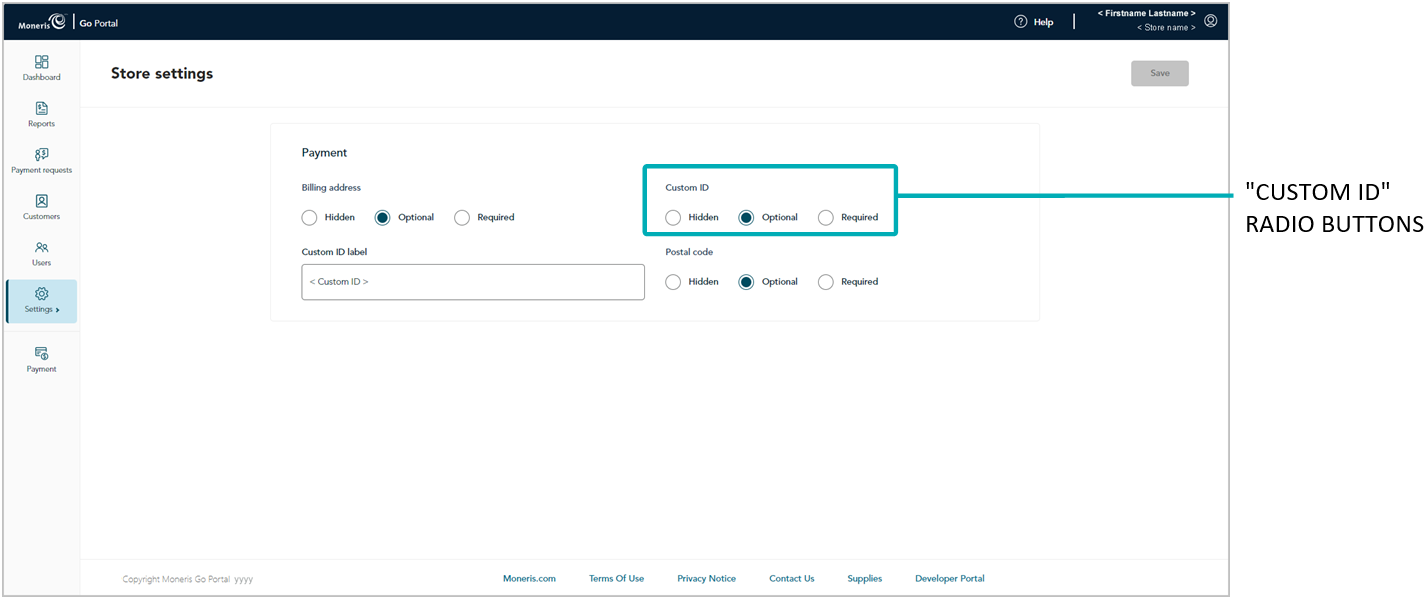
The steps below describe how to configure and enable/disable a custom transaction identifier (custom ID) field. If enabled, the custom ID field can be appended to payment requests and transactions that are initiated from the virtual terminal "Payment" window in your Moneris Go portal store. The custom ID also appears as a header11 in your store's financial transaction report and can appear as a line item on the "Transaction details" page and in receipts.
Note: For a complete list of transactions, reports, and receipt types that feature the custom ID, see Custom ID: list of transactions and reports.
Access your Moneris Go portal store's payment settings (see Store settings: payments).
On the "Store settings" page (shown below), click on a "Custom ID" radio button:

| Radio button | Description |
| Hidden |
Hides/disables the custom ID field in payment requests and the virtual terminal "Payment" window through which you perform Purchases, Preauthorizations, and independent Refunds in your Moneris Go portal store. Note: The default label "Custom ID" continues to be used as a header in your store's financial transactions report. If you enter your own custom label in step 3, it will be used as the header. |
| Optional |
The custom ID field displays (optional data entry) in payment requests and the virtual terminal "Payment" window through which you perform Purchases, Preauthorizations, and independent Refunds in your Moneris Go portal store. Note: The custom transaction identifier field displays as a header in the financial transactions report and as line item on the transaction receipt (debit/credit only) and the "Transaction details" page of every logged transaction. (The custom transaction identifier field is featured as a line item even if no data are captured in the field.) |
| Mandatory |
The custom ID displays as a payment field (mandatory data entry) in payment requests and the virtual terminal "Payment" window through which you perform Purchases, Preauthorizations, and independent Refunds in your Moneris Go portal store. Note: The custom transaction identifier field displays as a header in the financial transactions report and as line item on the transaction receipt (debit/credit only) and the "Transaction details" page of every logged transaction. (The custom transaction identifier field is featured as a line item even if no data are captured in the field.) |
Do one of the following:
If you selected "Optional" or "Mandatory" in step 2, enter a custom label in the Custom ID Label field.
If you selected "Hidden" in step 2, leave the Custom ID Label field unfilled (blank).
Note: If you leave the field unfilled, the default label "Custom ID" will be used as a header only in your store's financial transactions report. If you enter your own custom label, it will be used as the header in your store's financial transactions report.
Click on the Save button.
When the "Payment settings updated" response displays, the operation is complete.
Note: If you opted to configure/enable a customized identifier field of your own and you have one or more terminals synched to your store, you should also enable the equivalent custom "Transaction identifier" feature on the terminals (see Terminal settings: transactions).