- Tap the Main menu
 icon, then tap Settings.
 - On the Settings menu, tap Transactions.
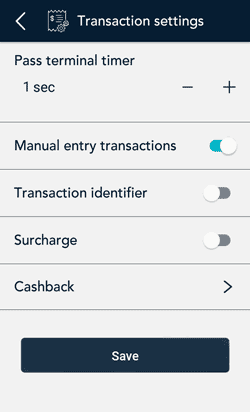
The Transaction settings screen appears.
- Change each setting as needed.
Pass terminal timer: When a customer response is needed, the application displays the “Please pass the terminal to your customer” screen for 1 second. Tap the minus sign or plus sign to change this time period.
Manual entry transactions: This setting allows you to manually enter a payment card number for purchases where the card is not present (CNP), such as email and telephone orders.
Transaction identifier: Enable this setting to create a custom field which you can use to capture specific information during your transactions. Once you tap the toggle, a field appears showing “Custom ID”. Replace “Custom ID” with a name for the type of information you want to record during each transaction. For example, Invoice # or Customer name.
Note: The transaction information you enter in this field on the terminal will appear in the Customer ID field in Merchant Direct.
Surcharge: Enable this setting to charge your customers a fee for Interac debit transactions. Once you tap the toggle, a field appears for you to enter the amount of the surcharge in dollars and cents, for example, "1.00".
Cashback: This feature allows you to offer cash back to customers when they make a purchase with a debit card (Interac, Debit Mastercard, and Visa Debit). To enable Cashback, tap the toggle. The other settings will appear.

- Cashback by dollar amount. Enable this option to allow customers to enter the dollar amount (no cents) they would like as cash back. The value must be a multiple of 5.
- Max cashback. Enter the maximum dollar amount you wish to offer to customers as cash back; for example, $100.
- Cashback preset 1. Tap the toggle to enable this preset amount. The Preset Value field appears. Enter a preset value that your customers can select; for example, $20.
- Cashback preset 2. Tap the toggle to enable this preset amount. The Preset Value field appears. Enter a preset value that your customers can select; for example, $40.
- Cashback preset 3. Tap the toggle to enable this preset amount. The Preset Value field appears. Enter a preset value that your customers can select; for example, $60.
- Tap Save when finished with Cashback settings. The application returns to the Transaction settings screen.
- When you are finished with the Transaction settings, tap Save.
The application returns to the Settings menu.
- To return to the default transactions screen, tap the Main menu icon, then tap Transactions.