Reports
Your transaction reports are available in two ways: through the Merchant Direct web portal; and directly in the Moneris Go Plus application on your terminal.
Moneris Go Portal reporting
Merchant Direct reporting
Reports in the Moneris Go Plus application
Filtering transactions on the Reports and End of day screens
Finding a transaction using Scan or Search
Moneris Go Portal reporting
In addition to the reports on the terminal, you can view real-time reporting on the Moneris Go portal.
Merchant Direct reporting
In addition to viewing reports on your Moneris Go Plus terminal, you can also view reports online by logging into Merchant Direct. (Refer to enrolment instructions if needed.) Merchant Direct allows you to view and download transaction reports by batch, date, user/clerk ID, and device number. You can also view and download standard monthly merchant reports and special reports. To login:
- Go to Moneris.com.
- In the top, right area of the screen, click Login.
- From the drop down list, select Merchant Direct.
- Enter your user ID and password.
Reports in the Moneris Go Plus application
All transaction information is available directly on the Reports screen.
IMPORTANT! You can see all transactions only if your user role is set to “View other users in reports.” For example, if your user role is “Low,” you may see only your own transactions. Refer to User roles.
|
|
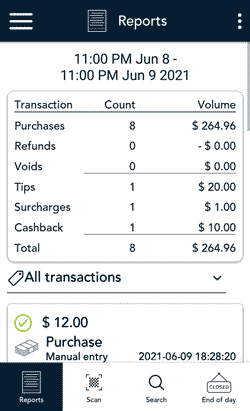
To view the Report screen, tap the Main menu  icon, then tap Reports. The screen shows: icon, then tap Reports. The screen shows:
- 24-hour Summary: This is a summary of all transactions processed on all your Moneris Go Plus terminals in the 24 hour period starting at your Report reset time. For example, if your reports are reset at 11 p.m., the summary shows transactions from 11 p.m. yesterday to 11 p.m. today. It shows the number of each type of transaction (example, Purchase, Pre-authorization, Completion, Refund, Void), their dollar volume, and tips, followed by a grand total. Totals for Tips, Surcharges*, and Cashback will also appear if you enabled those features. To find out how to enable them, refer to Settings.
*The operator of this Terminal charges a fee for INTERAC Debit Transactions. This fee is in addition to any fees that your financial institution may charge.
- All transactions: This is a list of all the transactions from all of your Moneris Go Plus terminals, including transactions from closed batches.
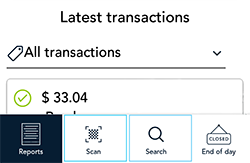
- If needed, tap the All transactions dropdown menu to filter by transaction type and method of card entry.
- You can scroll down to see more transactions.
- Tap any transaction to view the full details. On the transaction details screen, you can perform a Refund, a Void, or Reprint the receipt, as well as Completion or Void for pre-authorizations.
|
|
|
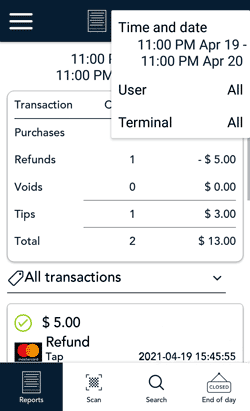
- Additional options: Tap the additional options ⋮ icon to display the options menu. This menu allows you to filter transactions by Time and date, User, and Terminal. You can apply one, two, or all three filters. For instructions on how to use the filters, refer to Filtering transactions on the Reports and End of day screens below.
- Scan or Search: Use either of these functions to find a transaction. Tap Scan to use the terminal’s rear camera to scan the QR code on a receipt. Tap Search to enter specific search terms. For instructions on using Scan or using Search, refer to Methods of finding a transaction.
|
End of day
|
|
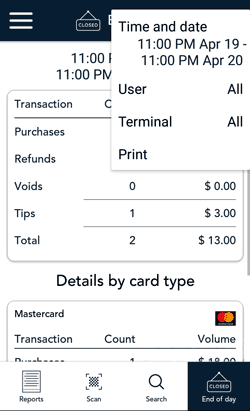 |
Tap End of day to view the End of day report which shows transaction totals since the Report reset time, followed by totals for each card type (Visa, Mastercard, Interac, and others). Totals for Tips, Surcharges, and Cashback will also appear if you enabled those features. To find out how to enable them, refer to Settings.
The End of day report can be used for a variety of purposes and the available filters can help you get the information you need.
- To filter transaction totals by Time and date, User, and/or Terminal, tap the additional options ⋮ icon to display the options menu. This menu allows you to apply one, two, or all three filters. For instructions on how to use the filters, refer to Filtering transactions on the Reports and End of day screens.
- Filtering transaction totals by User will enable you to get the totals for a specific user whether that user is a clerk, server, driver, or other employee.
- The end of day report also summarizes tips. In the default summary for all users, you can see the tips for your entire account which is useful if you want to pool and divide tips. When you add a User filter, you can see the tip total for a specific person. This can be helpful for tip payouts.
- You can use the Time and date filter on its own or in combination with the User or Terminal filters when you want to see a summary over multiple days for a pay out. This might be the case when an contract worker takes a terminal at the beginning of the week and returns it once their shifts are done. They can filter by Time and date plus Terminal, or Time and date plus User, to summarize all the transactions they completed.
- Users can access the report and the filters from any of your Moneris Go Plus terminals as long as the user has access to “View other users in reports” in their user role.
- You can also streamline your business processes by having someone in your office pull these reports from a centralized terminal.
- To print the End of day reports as you apply different filters, tap the additional options ⋮ icon, then tap Print. Store the printed reports for your records as needed.
|
Filtering transactions on the Reports and End of day screens
Tap the additional options ⋮ icon to access the Time and date, User, and Terminal filters to create a customised view of your transactions/totals. You can apply one, two, or all three filters.
 |
Time and date filter
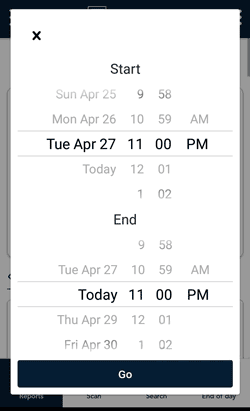
- On the additional options menu, tap Time and date to display the time and date selector. The default start date is the previous day. The default start time is based on your report reset time, for example, 11 p.m. This is intended to cover a 24-hour period. You can change the Start and End values to display transactions for another period.
- Under “Start”, select a date by scrolling through the date column. Change the hour and minute, as needed, by scrolling through the values. Tap AM or PM.
- Under “End”, the default date is “Today”. The default time is based on your report reset time. Select a new end date and end time as needed. Tap AM or PM.
- Tap Go to apply the Time and date filter.
The screen displays only the transactions/totals that match the time and date range you specified.
Note: To restore the default view (the current 24-hour period), navigate away from the Reports screen. For example, you can tap End of day. The next time you view the Reports screen, the current 24-hour period will be displayed.
|
 |
User filter
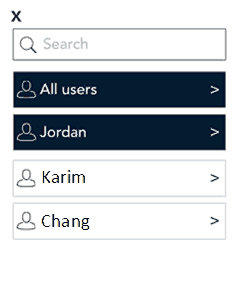
- On the additional options menu, tap User to display a list of your users.
- All users and the current user are already selected.
- To select a different user, tap the user's name.
- The screen displays only the transactions/totals for the user or users you selected.
To restore the default view (all users), repeat step 1 and select All users.
|
 |
Terminal filter
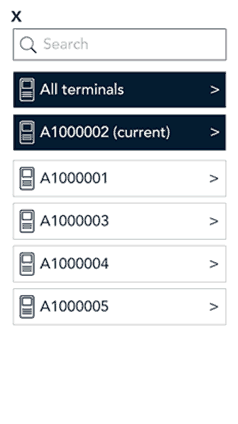
- On the additional options menu, tap Terminal to display a list of your terminals.
- All terminals and the current terminal are already selected.
- To select a different terminal, tap it.
- The screen displays only the transactions/totals for the terminal or terminals you selected.
To restore the default view (all terminals), repeat step 1 and select All terminals.
Note: Filters are automatically cleared when you navigate away from the Reports screen. When you return to Reports, you will see the default view, that is, all transactions for all users for all terminals for the current 24-hour period.
|
Finding a transaction using Scan or Search
In addition to scrolling through the transactions, you can find a transaction by tapping Scan or Search.
Scan the QR code on a receipt
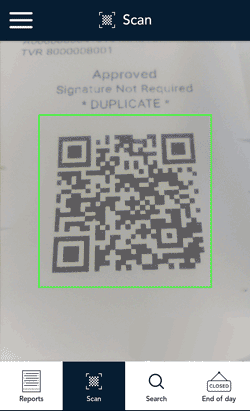 |
You can quickly find a specific transaction on the terminal by scanning the QR code on a printed receipt for that transaction.
- On the Reports screen, tap Scan.
The terminal’s rear camera is activated.
- Hold the paper receipt below the terminal so that the QR code is visible on the screen.
- The application automatically reads the QR code and retrieves the transaction details.
|
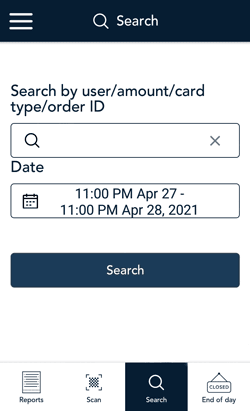
Search for a transaction using specific values

|
You can also find a transaction on the terminal by entering a specific search term..
- On the Reports screen, tap Search.
The Search screen appears.
- Tap the Search field to enter a value to look for. You can enter:
- A username. The application will find all transactions processed by that person.
- An amount. For example, 50.20.
- A card type. For example, Visa, MC, Amex, and Interac.
- An order ID.
- Review the Date field which displays the current 24-hour period.
- If you want to keep the current dates, skip to the next step.
- To change it, tap the field and select a new Start date/time and new End date/time, as required, then tap Go.
- Tap Search.
- The application retrieves any transactions that match both the search value you entered and the date range.
- The application displays a list of matching transactions.
- To quickly change the date/time range of the search, tap the additional options ⋮ icon, then tap Time and date, select a new range, then tap Go.
- To print the search results, then tap Print. The terminal will print up to 50 transactions.
- Tap a transaction to see the transaction details.
- If no transactions are found, tap the Back < icon in the title bar to return to the Search screen.
|