The Dispute Management module in Merchant Direct provides a quick glance at chargebacks, and copy requests. There is also a dashboard to provide information at a glance.
search by date range
select accounts to search
find disputes (transaction search)
view and take action on chargebacks and copy requests that require your attention
view chargebacks and copy requests received within a date range
view chargebacks and copy requests that are being reviewed by Moneris
view chargebacks and copy requests that have been closed
view chargeback dispute groups
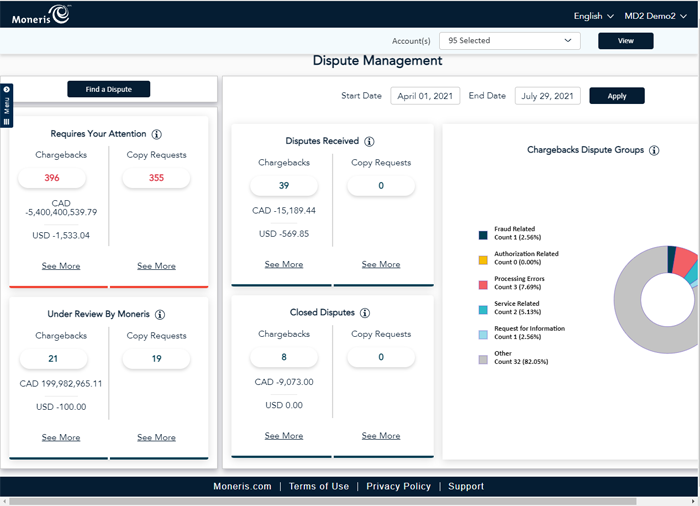
The data that appears in the "Requires Your Attention" and "Under Review by Moneris" sections is current, real-time information. The data that appears under the "Disputes Received", "Closed Disputes", and "Chargebacks Dispute Groups" sections is historical, and is responsive to the date range entered above.
As with other reports and modules in Merchant Direct, use the Account(s) selector to select accounts on which to report.
Note: Merchants that are not part of a chain, e.g., a single store with a single account, will not be required to select an account.
The Dispute Management screen will enable you to pull four months of data by selecting a start date. For example, if you select a report to begin on February 1, 2021, the report will automatically fill in an end date of May 31, 2021.
When you initially enter the Find A Dispute screen, you will notice that the Accounts and dates are already populated with the accounts and dates selected in the Dispute Management screen.
There is a floating dynamic navigation aid on the left side of the screen that displays the section headers. You can click on a section header to be taken directly to the section, or use the vertical scroll bar to scroll up and down.
Note: The functionality to find a disputed transaction is very similar to the process to find a transaction.
Note: If you wish to, you can select different accounts or a different date range.
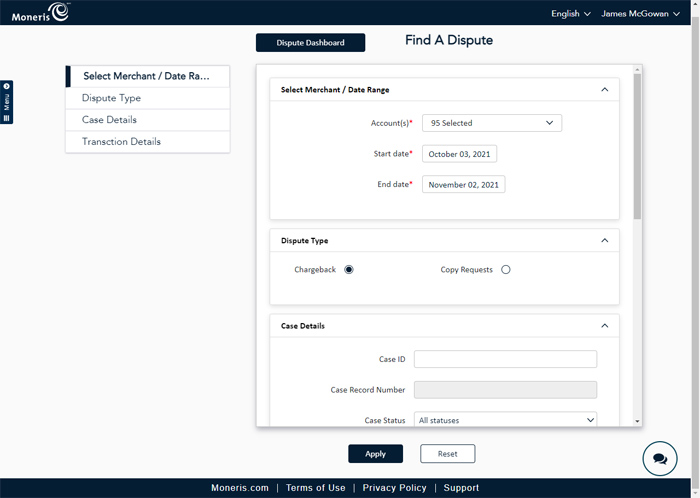
Follow the instructions below to find a dispute in Merchant Direct.
Note: Selecting Chargeback will open up some additional fields below; copy requests don't have Merchant Adjustment Amounts associated with them.
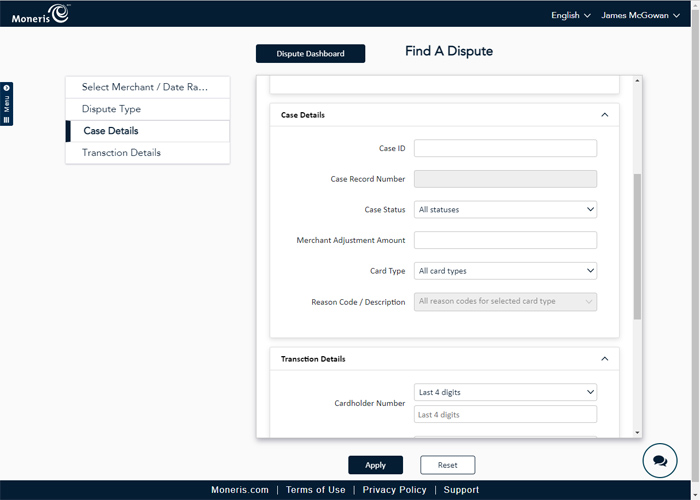
(Optional) In the Case Details section, enter one or more search criteria as follows:
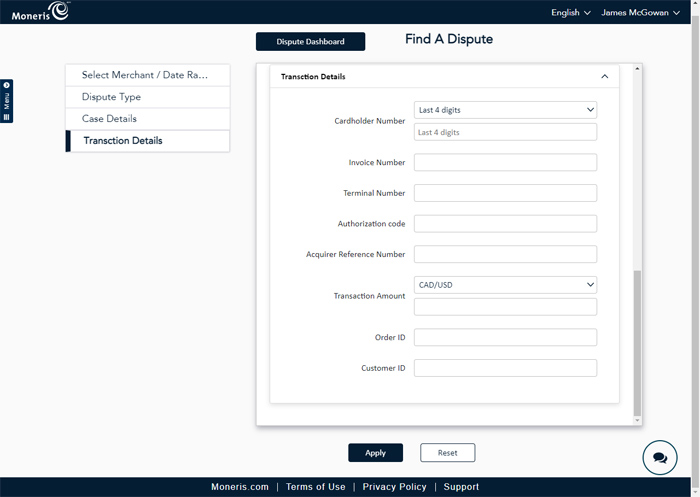
(Optional) In the Transaction Details section, enter one or more of the search criteria as follows:
Cardholder Number: Click the drop-down menu and select the search criteria you are going to use to search for the card number. Choose from the first six digits of the card, the last four digits of the card, or a combination of the first six and last four digits to search. Once you have made your selection, enter the card number in the field below. For example, if you selected Last 4 digits, you would enter a number that represents the last four digits of the card into the field, e.g. "0987".
Invoice Number: Enter the invoice number associated with the transaction into this field.
Terminal Number: Enter the 8-digit terminal ID of the terminal on which the transaction was processed.
Authorization code: Enter the authorization code (Auth#) from the original transaction into this field.
Acquirer Reference Number: Enter the reference number (Ref#) from the original transaction into this field.
Transaction Amount: Select the currency by which the transaction was processed from the CAD/USD drop-down menu, then enter the amount of the transaction in the field below.
Order ID: Enter the order ID (transaction number) into this field.
Customer ID: Enter the ID of the customer attached to the transaction into this field.
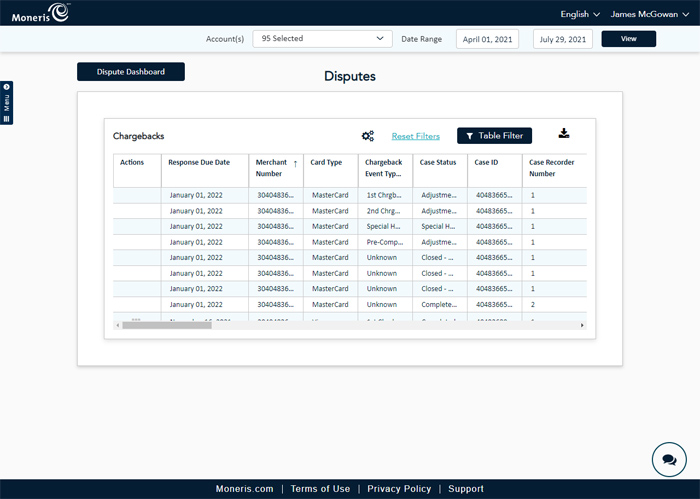
Click the Apply button at the bottom of the screen. The Disputes screen appears with the results of your search.
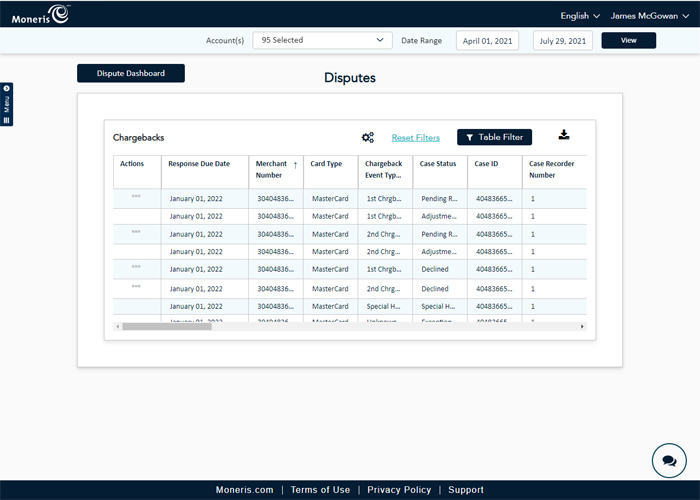
Note: Not all cases will have actions available.
Click the ellipsis button (...) in the Actions column.
From the drop-down menu that appears, select the type of action you want to perform on the chargeback:
To resolve the dispute, click Resolve Dispute. Proceed to the Resolve disputes section below for instructions.
To accept the chargeback, click Accept Case. Proceed to the Accept cases section below for instructions.
Follow the instructions below to resolve a disputed transaction.
Note: When resolving disputes, you are required to upload supporting documentation as specified by the card issuer in the Remedies field on this screen. Each dispute will have different requirements depending on the situation.
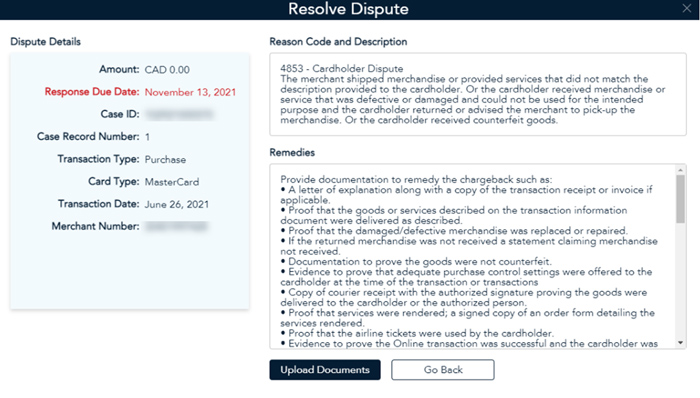
In the Resolve Dispute screen, click the Upload Documents button to upload supporting documents.
Click the Browse button that appears to begin browsing your computer's hard drive for the required information.
Use the Open dialogue box to browse your computer's hard drive to locate the supporting documentation.
Once you locate the supporting document, select it and click Open. The Resolve Dispute screen reappears with the file listed.
If other documents are required. repeat steps 2-4 to upload other documents to support the resolution as necessary.
Once all the documents have been uploaded, click the Submit button. Moneris will investigate and contact you with the resolution.
Follow the instructions below to accept a disputed transaction.
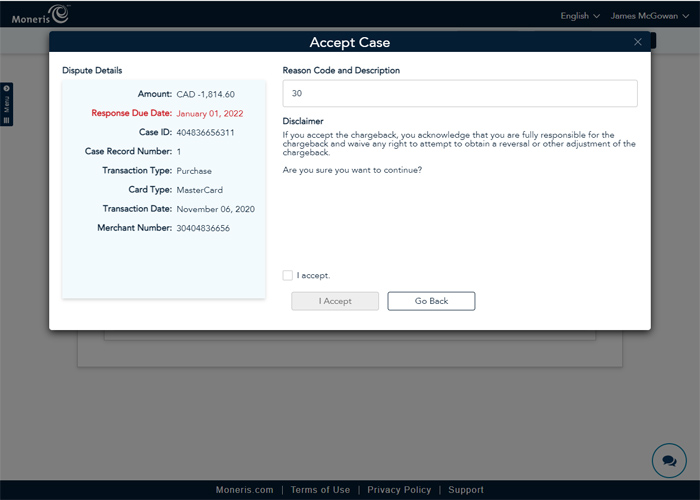
In the Accept Case screen, read the disclaimer statement.
If you are sure you want to accept the responsibility for the chargeback, place a checkmark in the I accept checkbox.
Click the I Accept button at the bottom of the screen. The Disputes screen reappears.
The Dispute Management screen features four areas where you can view:
Under the headings (Requires Your Attention, Disputes Received, Under Review By Moneris, and Closed Disputes), you can see the number of the chargebacks and copy requests, and the dollar values of the chargebacks.
Click the See More link under the section in which you are interested, and the Disputes report for the selected section will appear. For example, if you want to review chargebacks that have been closed/resolved by Moneris, click the See More link under Chargebacks in the Closed Disputes section.