This option allows you to receive personalized support by submitting questions through the Merchant Message Centre. Follow these steps to submit an inquiry to the Moneris Support team.
1. Click the envelope icon in the upper right-hand corner to access the Moneris Message Centre inbox.


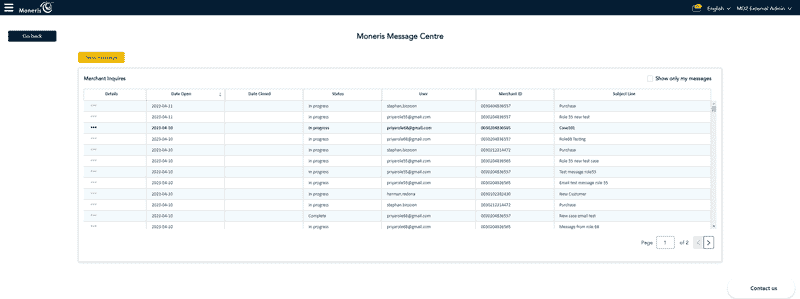
The Moneris Message Centre inbox provides a list of all Merchant Inquires submitted to the Moneris Support team. Messages appear from newest to oldest, and provide additional information about the:
Note: Columns can be rearraged to best suit your needs. Click on the column title and drag the column to your preferred location. The existing column in that spot will shift one space to the right.
Tip: Check off Show only my messgages in the top right-hand corner of the Moneris Message Centre inbox to filter out your personal inquires only.

Once an inquiry has been submitted, a user is able to view the message, along with any additional information that has been provided by the Moneris Support team, regarding the request.
To view message details, from the Merchant Inquiries, choose the inquiry submission you wish to review; this can be determined by the Subject Line.
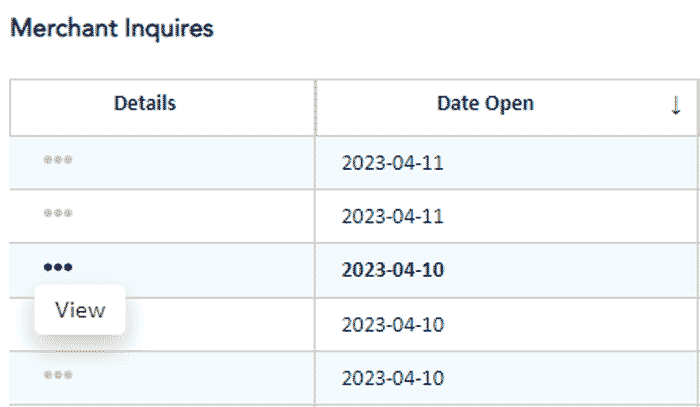
1. Click the 3 dots next to the inquiry you wish to review to display the View button.

2. Select the View button to view the inquiry details.

Note: Use this page to review replies sent to or received by the Moneris Support Team about your inquiry.
To send a new message to the Moneris Support team about this submitted inquiry:
1. Enter the message details in the Reply section.
2. Click the Send to submit your new message or click Cancel to return to the Merchant Inquiries inbox.
This option allows you to send a new inquiry to the Moneris Support team.
1. Click the New message button.

Note: To complete an inquiry, the following sections must be completed:
2. Click on the Category that you need help with.

Note: Each category provides a brief description to make sure you are submitting your inquiry under the right category.
Note: Use the Go back button to return to the last page to correct or update any of the information provided. This button will appear throughout.

3. Once you have selected a category, e.g. Financial, a new window will appear. Click on the sub-category that you need help with.

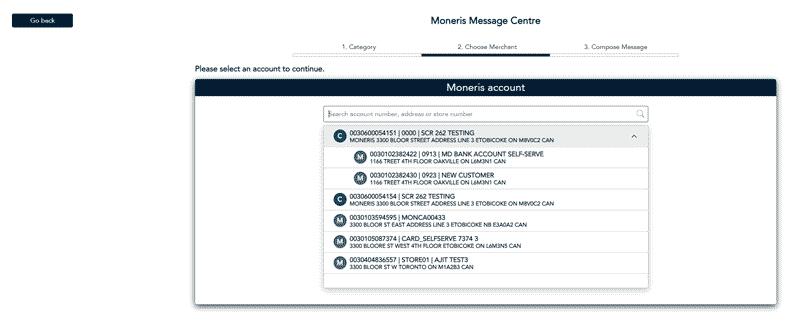
4. Once you have selected a sub-category, e.g. Deposit Inquiry, a new window will appear. Under the Choose Merchant section, select the account associated with this inquiry.

Account selections are broken down by the following options:
![]() Chain, or
Chain, or
 Merchant
Note: Be sure to select the correct Merchant number associated with this inquiry before proceeding.
Note: Some inquiries can only be submitted on a Merchant level. In these cases, you will not be able to choose a Chain associated with your account.
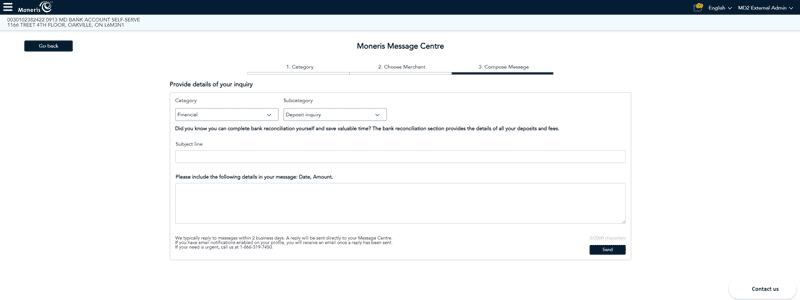
5. Once you have selected the account (Merchant or Chain), a new window will appear under the Compose Message section.

Note: The account associated with this inquiry can be found in the top left-hand corner of the screen. Always double check the location to ensure the correct Merchant or Chain was selected.
6. Under Category, use the drop down menu to confirm or change your initial selection for this inquiry.
7. Once you have chosen the Category, use the drop down menu to confirm or change your initial Subcategory selection for this inquiry.
Note: Helpful tips will appear below these sections to help save you valuable time.
Note: Only two categories (Financial help, Place an order) are available on a Chain level. All other options are available on a Merchant level.
If you started your inquiry in regards to a Chain, but wish to select a catergory that differs from the two listed above (Financial help, Place an order), click the Go back button twice to return to the 1. Category section. Select the specific Merchant number that falls under the Chain that this inquiry is in regards to, and resume your inquiry submission.
8. Enter a Subject line.
Tip: To help keep track of your submitted inquries, here are some key details that can be included: subject of your inquiry, store or chain Merchant ID, and date of submittion.
9. Once you have entered a Subject line, compose your message the the bottom section.
Note: A helpful tip will appear above this section with key details that should be included in your message.
Note: Avoid using the following special characters, as they will genetate an error message, and prevent your message from being submitted:
If any these symbols are included in your message, the following error messge will appear once you click Send:

To resolve this issue, remove any of the above special characters from your message, and try again.
10. Once you have composed your message, click the Send button in the bottom right-hand corner of the screen.
Note: You will not be able to move forward until both a subject line and message have been entered. Each section requires a minimum of 1 character to proceed. Fields left empty will display a Field cannot be empty. warning message.

Once you have clicked the Send button, you will be taken back in your Moneris Message Centre inbox. Your new message will appear at the top of the list of submitted inquiries.
New Messages: An email notification, with a link to your submitted inquiry, will be sent once a reply has been provided by our Moneris Support team.
Note: This email will only be received if email notifications are turned on in your Merchant Direct account, and will go out to any member of your organization who has contributed to the inquiry thread.
Closure Message: An email notification will be sent to inform you that your inquiry has been resolved/closed or if no response to a New Message notification has been received in 10 days.